Robert M. Bernstein, MD,*† William R. Rassman, MD, ‡ Nazia Rashid, and Richard C. Shiell, MBBS
Dermatologic Surgery 2002; 28(9): 783-94>
*College of Physicians and Surgeons, Columbia University, New York, New York
†New Hair Institute Medical Group, A Professional Corporation, New York, New York and ‡Los Angeles, CA
© 2002 The American Society for Dermatologic Surgery
This is the first of a two-part series. Part I discusses the most common problems encountered in surgical hair restoration and presents general concepts in corrective work. Part II addresses the technical aspects of performing the actual restoration.
PART I: General Aspects of Repair and Basic Repair Strategies
Introduction to repair
Cosmetic problems produced by poorly executed hair transplants
Major limitations inherent in restorative procedures
Basic repair strategies
PART II: The Tactics of Repair
Why Follicular Unit Transplantation is the ideal tool for repair
Specific repair techniques
Removal and re-implantation
Removal alone
Camouflage
Special cosmetic problems
Repair of the donor area
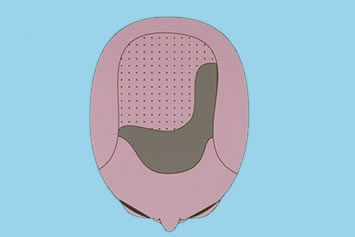
A. Follicular Unit Transplantation
The Ideal Tool for Repair Poor planning, bad judgment and sloppy techniques when transplanting hair result in cosmetic defects and poor growth. Some of the problems with a hair transplant, however, are intrinsic to the procedure itself and cannot be totally avoided, regardless of how conscientious the doctor or impeccable the technique.
For consistent, high quality results in hair transplantation repair procedures, the authors generally advise performing the hair restoration procedure using follicular units exclusively. In repair procedures where there is already scarring and hair wastage, using a procedure that minimizes wounds, maximizes the utilization of donor hair, and looks natural, is important. A detailed description of Follicular Unit Transplantation (FUT) is beyond the scope of this paper and can be found elsewhere. ((Limmer BL. Elliptical donor stereoscopically assisted micrografting as an approach to further refinement in hair transplantation. Dermatol Surg 1994; 20:789-793.)), ((Bernstein RM, Rassman WR, Szaniawski W, Halperin A. Follicular Transplantation. International Journal of Aesthetic and Restorative Surgery 1995; 3:119-132.)), ((Bernstein RM, Rassman WR. Follicular Transplantation: Patient evaluation and surgical planning. Dermatol Surg 1997; 23:771-784.)), ((Bernstein RM, Rassman WR. The aesthetics of Follicular Transplantation. Dermatol Surg 1997; 23:785-799.)), ((Bernstein RM, Rassman WR. The logic of Follicular Unit Transplantation. Dermatol Clin 1999; 17 (2):277-295.)) Follicular Unit Transplantation represents the ideal tool for repair for the following reasons:
• The techniques used in FUT, namely single strip harvesting and microscopic dissection, permit maximum utilization of the donor supply.
• The small size of follicular units permits small wounds that limit further damage to areas that have already been scarred.
• The relatively greater hair content of follicular units, as compared to mini-micrografts of the same size, allows them to provide greater camouflage.
• By duplicating the way hair grows naturally, follicular unit grafts provide the most natural restoration.
Excising the donor tissue as a single strip is especially important in repair work since the orientation of hair follicles in the donor scalp have been altered from prior surgery. Because of this, a multi-bladed knife (the traditional harvesting tool in mini-micrografting) can cause excessive follicular transection. Once the strip is removed, microscopic dissection allows the retrieval of donor hair in and around the scar tissue produced by the old transplants, significantly increasing the amount of usable hair. Traditional graft dissection under direct visualization, even using magnifying loupes, does not provide enough resolution to ensure that the follicles, distorted by the surrounding scar tissue, are removed intact.
When follicular units are dissected from the donor strip, grafts are generated that contain a greater proportion of hair in relation to skin than in the surrounding tissue. This is unique in hair restoration surgery as both punch grafts and mini-micrografts have essentially the same ratio of skin and hair as the tissue from which they were removed. Since follicular units are more “compact” hair bearing structures (some of the non-hair bearing skin has been removed in the dissection) they can fit into smaller recipient wounds and minimize additional insults to the donor area. Because of their high hair content relative to mini-micrografts of the same volume, they also serve to provide greater camouflage of existing grafts.
B. Specific Repair Techniques
Graft removal with re-implantation of the hair as individual follicular units and camouflage are the methods used for most restorative work. At times, graft removal alone is indicated. The following sections describe specific repair techniques organized under these three broad types of repair work. We will also discuss some special cosmetic problems than cannot easily be managed using these basic techniques alone. These include defects from scalp reductions, severe scarring, and hair loss from face-lifts. Finally, we will discuss methods to repair the donor area when the donor area itself becomes a cosmetic problem.
1 – Removal and Re-implantation
Removing all or part of a large graft is a simple technique that can be used to eliminate or decrease the unnatural density of the old plugs. It is accomplished by punching, or coring out all or part of the old graft and either completely removing it, or leaving a crescent shaped sliver of hair behind.
Removing only part of the graft has a number of advantages:
1) it preserves some of the hair in the original graft
2) it enables the removed hair to be re-used
3) the results are immediate
4) the short-term cosmetic problem of a gap that may result when an entire large graft is removed is avoided
In spite of the relative ease of removing only part of a graft, grafts should be completely removed when:
1) the grafts are in an inappropriate location, such as too low on the forehead or too far forward on the temples
2) the hairs in the grafts are pointing in the wrong direction
3) the base of the grafts are severely scarred, indented (often seen with large slit-grafts), or are at a different level than the surrounding skin.
When the grafts are to be removed entirely, it is extremely important to tell the patient that this will most likely require more than one session, as some regrowth of hair is common.
There are three disadvantages of graft removal.
1) some loss of hair from transection during the removal process
2) time delay for final result
3) additional cost In spite of these minor disadvantages, if graft removal is indicated, it has been our overwhelming experience that it is cosmetically worthwhile for this to be done, and that it should be completed prior to the formal camouflage procedure.
Punch Excision
Punch excision is best carried out with a hand-held, disposable punch. Hand-held punches allow more precise control of the depth and angle of the incision than motorized punches, and are less likely to caught in the surrounding hair.
Disposable punches tend to be sharper than re-usable punches and can be discarded as soon as they begin to dull. They also have thinner walls, allowing for a more precise incision. These authors particularly like a hand-held punch as it enables the surgeon to “feel” when the punch completely encompasses the graft and when it causes transection. When resistance if felt from hair shafts, one should put down the punch and continue the graft removal with fine gradle scissors. The Gradles can be used to dissect out the lower portion of the follicles, avoiding further transection.
Disposable punches in sizes ranging from 1.5mm to 3.5mm are the most useful for repair work. Punches less than 1.5mm make it extremely difficult to follow the full length of the follicle, as its architecture is usually distorted by scar tissue. Punches greater than 3.5mm risk further scarring in the recipient area, can be difficult to close if the surrounding skin is tight, and can cause puckering or a small dog-ear deformity when sutured.
Before excising problem grafts, one should clip the hair in the graft approximately 1.5mm above the scalp surface. At this length, the punch will fit easily over the tuft of hair emerging from the graft and there will be enough hair length to follow its direction. Keeping the punch parallel to the hair as the punch is rotated back and forth between the fingers is probably the most difficult, but important part of the procedure. Even slight deviations from a parallel orientation will cause transection and damage to the follicles.
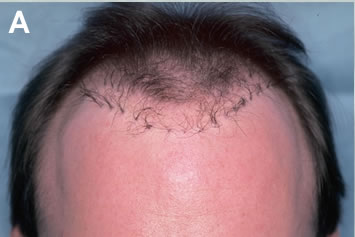
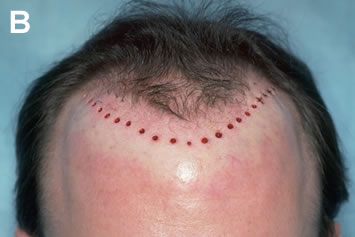
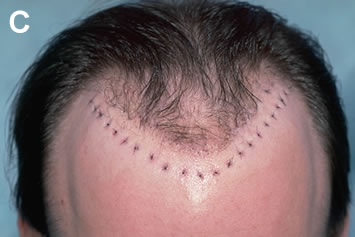
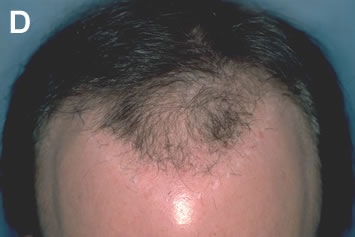
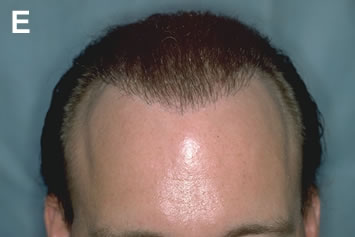
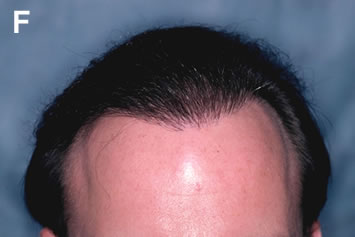
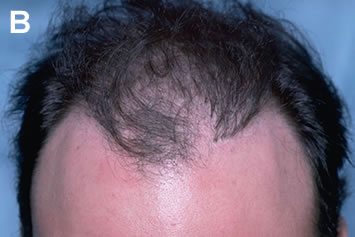
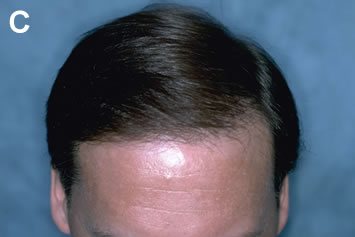
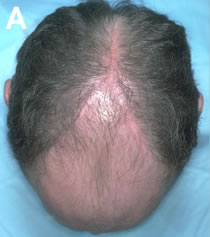
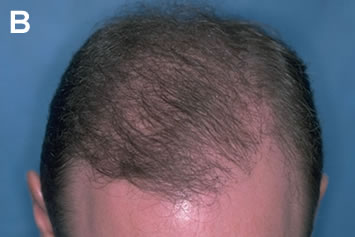
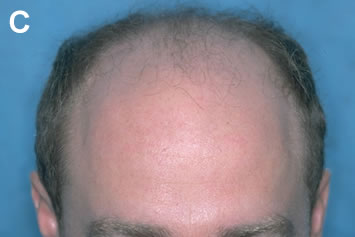
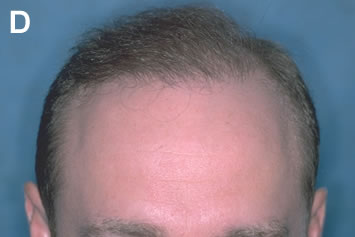
Determining the appropriate punch size is extremely important to the success of the procedure. As grafts heal, the body creates scar tissue that distorts the follicles. This causes a contraction of the hair shafts in the dermis, producing a relatively small surface footprint, but causing the follicles in the subcutaneous space below to splay apart. The dilemma is that if one uses a small punch to minimize surface scarring, some of the follicles will be missed and a portion of the graft will regrow. If one tries to capture all of the follicles in the punch, the surface defect may be unacceptably large (Figures 1A-F).
When the main cosmetic problem is that the plugs are too large or dense, the goal may be to decrease their density rather than to remove them completely. In this situation, the splay of follicles will permit some hair to remain in the area even if all of the visible surface hair appears to have been removed. As a general guide, approximately 25% of the hair in most punches will re-grow even if the punch fits neatly over all of the emerging hair. Because of this, attempting to remove only part of a plug will often leave too much hair behind. Densitometry ((Rassman WR, Pomerantz, MA. The art and science of minigrafting. Int J Aesthet Rest Surg 1993; 1:27-36.)) is a useful tool to determine the hair count of a given graft. It has been our experience that gross inspection tends to underestimate this number.
The following general guidelines are useful when attempting to decrease the density of plugs:
• For large grafts well behind the frontal hairline, decrease the density to approximately 6 hairs each. In a virgin scalp, one would normally opt for 4-hair grafts in the areas where greatest density was desired, such as the forelock area. In a repair, one must weigh the affects of additional scarring and some hair wastage intrinsic to the repair. Thus, this rule of not exceeding the size of a naturally occurring follicular unit would be bent slightly. For example, if the graft contained 24 hairs, one should remove the entire surface footprint (expecting that approximately 25% of the hair will regrow). It is important to point out that if the skin in the recipient area is tight, the wound from a punch wide enough to remove a large graft in a single session might not close easily. In this situation, two or more procedures might be required.
• If a plug is large, especially if its hair is not tightly packed, or the graft has an oval configuration, punch out only the mid-portion. When the center is sutured, the ends become isolated, essentially converting the large plug into two smaller, more acceptable appearing grafts.
• With grafts behind the hairline, only remove enough hair so that the remaining parts of the large plug can be camouflaged in subsequent sessions. The decision regarding how much of the grafts should actually be removed should depend on the size and visibility of the grafts and the amount of donor reserves. With high donor reserves and centrally placed grafts, little density reduction is usually required, even if the grafts are large. However, in patients with depleted donor reserves, where significant camouflage is not possible, the visual impact of these grafts might need to be completely neutralized with aggressive excision and re-implantation.
• Grafts in the frontal hairline usually need to be reduced to a maximum of 1-2 hairs to look natural. In this location, attempting to remove the entire footprint of a larger graft will often result in a smaller graft of this size. If there is any doubt whether it would be better cosmetically to remove a particular graft near the frontal hairline or simply camouflage it, one should err on the side of excision.
Immediately place excised grafts under a stereomicroscope and dissect them into individual follicular units. In the average repair case, one excised (or partially excised) graft yields approximately three follicular units, although not all of the units are intact because of the damage caused by the original procedure(s). The new follicular unit grafts are placed in a region of hair loss separate from the area of plug removal. For example, if a rim of large grafts is removed, the new grafts are placed in the central forelock area, rather than at the hairline. If plugs are removed from only one side of the scalp, then the new follicular unit grafts might be placed in the other side.
In the re-implantation phase, it is important to place the new grafts far enough apart. Since repairs are spaced only two months apart, there is insufficient time for the hair to grow to a visible length before the next procedure. By spreading out the small number of follicular grafts harvested from plugs over a relatively large area, it is unlikely that grafts of a subsequent session of camouflage will interfere with those of the first, even if placed in the same approximate location. In contrast, large follicular unit transplant sessions are spaced 8-12 months apart to ensure that all of the grafts of the first session can be identified and deliberate spacing of grafts of the second session with respect to the first is possible. This would apply to both transplantation in virgin scalps and the camouflage stage of repair procedures.
When the grafts to be removed all lie in a single row, the closure of one graft has little impact on adjacent ones, and may even make their closure easier. In this case, all of the grafts in the row can be removed in one session, even if they are closely spaced. However, it is usually difficult to remove more than one row of grafts in any one session if the rows are close together, as the closure of a wound in one row will place tension on the wound in the next, making it more difficult for wounds in the second row to be sutured closed.
Defects that result when round plugs are removed are usually oval, with the long axis of the oval naturally falling along skin lines. If suturing the defects in one row places tension on the next row, the oval configuration of the defects in the second row changes direction 90o, so that the long axis points towards the sutured row (instead of parallel to it). The new direction of the oval now lies perpendicular to skin lines, making these wounds more difficult to suture. If the removal of grafts and subsequent closure makes the adjacent row of removed grafts more difficult to close, the rows should be excised at different times (eight weeks apart). Preferably, the anterior row should be removed first.
The majority of patients require 1-4 sessions of graft removal prior to the actual camouflage procedure, with the average being two sessions. There should be a two-month interval between graft excisions and a two-month interval between the last excision and the camouflage procedure. The period between repairs allows hair in the grafts to grow so that the visible stubble can direct the removal of residual hair in previously excised grafts. The two-month period between the last excision and the camouflage procedure allows the sutured area to heal well enough that it will accept new follicular unit grafts transplanted into the area of previous excisions without the risk of dehiscence. As with Follicular Unit Transplantation procedures in virgin scalps, camouflage procedures should be spaced a minimum of 8-12 months apart. This allows for a better distribution of grafts and permits both the surgeon and patient to observe the cosmetic impact of the prior procedure before planning the next session.
Suturing Techniques
Prior to punch excision, the skin should be stretched perpendicularly to skin lines. This allows the circular wound to relax into an oval shape allowing for easier closure. Wounds made by 3mm or smaller punches can usually be closed with one suture. Wounds 3.5mm or greater usually require two stitches, especially when the skin mobility is low and the punch wound remains circular after the tissue is removed. For ease of suture placement when two sutures are required, both sutures should be placed before either is tied.
When suturing the punch wound closed, the wound edges should be perfectly aligned and the walls of the dermis flush to promote optimal healing. Because the operating area is small, the choice of suture material and needle are important. The best non-absorbable sutures are nylon. Ethilon 5-0 black monofilament Nylon with a PC-1 conventional cutting needle provides adequate strength for all punch closures, and appears to have a decreased risk of cutting through tissue when there is some resistance to closure (as compared to the finer 6-0 suture). A 5-0 suture is preferred for closing large punch wounds, when there is scarring and the skin is pliable, when there is tension (i.e. the defect remains circular rather than oval) and when the excisions are on the crown. Ethilon 6-0 black monofilament nylon, 45cm, P-1 cutting needle is useful when a second stitch is required in the same punch site or when very small punches are used (i.e. 1.5mm and 2mm).
When placing the suture, it is important to place the suture completely through, and parallel to, the walls of the punch. Stabilizing the edge of the punch with fine, rat-tooth forceps will aid in needle placement. Simply following the natural curve of the needle through the tissue will often take a bite that is too superficial and will not produce as good a result. The PC-1 needle is easy to use and will retain its shape longer than the finer P-1 needle. It is important to use a fine, non-serrated needle holder for the suturing, as a larger or serrated one will not allow for precise control and will tend to bend the needle.
Patients are asked post-operatively to keep the sutured wounds well hydrated with repeated applications of Bacitracin ointment, although any anti-bacterial ointment will suffice. Post-operative dressings are not required and sutures are usually removed at one week. The sutures are left in a few days longer if there was significant tension. Unless the skin is extremely lax or the punches very small, removing sutures sooner than one week is not advisable as the round/oval shape tends to have some memory and will stretch if the sutures are removed too soon. We have not observed any persistent stitch marks when sutures were removed at one week, so the rush to remove them sooner does not appear to offer any advantage.
When patients have light hair and the black nylon sutures are a cosmetic problem, or when patients are unable to return for suture removal, un-dyed absorbable sutures, such as Polyglactin 910 (Vicryl Rapide 5-0 braided Polyglactin 910, 45cm, un-dyed, P-1 cutting needle), are recommended. It is absorbable, easy to tie and light colored. Its disadvantages are that it does not come on a very small needle, and it is difficult to tie a secure knot if there is wound tension.
A recent study showed that the long term results from closing punch biopsy sites with Polyglactin 910 as compared to nylon was identical. ((Bernstein RM, Rassman WR, Rashid N. A new suture for hair transplantation: Poliglecaprone 25. Dermatol Surg 2001; 27(1):5-11.)) For the purpose of plug removal, the minor inflammation in this area caused by the suture may even work to the surgeon’s advantage as it could potentially destroy follicles that were not removed with the punch and inhibit the re-epithelization of the suture track.
Poliglecaprone 25 may be used to close both punch and linear incisions made during the repair. Monocryl 6-0 monofilament Poliglecaprone 25, 45cm, un-dyed, P-1 cutting needle, is particularly useful to close punches as it comes on a small needle, is clear, and is very strong. Monocryl 5-0 monofilament Poliglecaprone 25, 45cm, un-dyed, PS-2 cutting needle, is useful in closing linear excisions with a running stitch. Their only disadvantage seems to be their slow rate of absorption.
We expect that Poliglecaprone 25 may soon become our suture of choice in repairs, as it has been for closing the donor wound in regular transplants. ((Gabel EA, Jimenez GP, Eaglstein WH, Kerdel FA. Performance comparison of nylon and an absorbable suture material (Polyglactin 910) in the closure of punch biopsy sites. Dermatol Surg 2000; 26(8):750-753.)) Other absorbable sutures, such as Vicryl, Chromic, or Gut incite too great an inflammatory reaction or lack sufficient tensile strength.
Linear Excision
Graft removal using a long, elliptical excision is useful when grafts are closely packed in a linear arrangement, when the grafts are very large and dense, when the grafts are to be completely removed, or when it is mandatory that the patient have the removal phase of the repair completed as quickly as possible. Since the subsequent yield of intact hair follicles will be greater with a single linear incision than with multiple small ones, a single linear incision should also be considered when the patient’s donor reserves are severely depleted. In addition to conserving hair, linear excisions are useful in patients with low reserves as they are the most efficient and the fastest way to redistribute the density over a wide area.
Removing multiple grafts with one long curvilinear excision does not always produce as positive a cosmetic result as removing the grafts individually with punches. The contraction of the long incision over a curved scalp may cause a slight elevation of one wound edge (usually the convex edge). This tendency may be compounded by the fact that the two edges of the incision have to be angled slightly to match the angle of the hair in the grafts, causing the one angled more acutely to rise up slightly over the other as the wound heals.
If the plugs have been transplanted very low on the forehead, the upper wound edge may be comprised of relatively thinner bald scalp and the lower edge of more sebaceous, sun exposed skin, making the match and alignment of the two edges especially problematic. The multiple small incisions of the punch excisions can often circumvent these problems, and they heal more consistently with barely detectable scars. However, the use of punches must be balanced by the fact that they require more sessions and are not as efficient in removing all of the abnormal grafts as linear excisions. Although more tedious, it is generally preferable to remove each graft individually, as this avoids a line scar and gives a more predicable result.
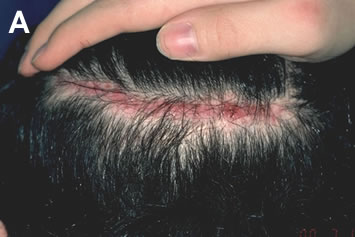
The linear excision can often be closed with a single-layer of interrupted or running sutures provided that the suture bites extend the full thickness of the dermis to ensure good wound edge apposition. A limited number of buried, interrupted sutures may be useful if: 1) the excision is particularly long or curved (Figures 2A-D), 2) the opposing wound edges are of unequal thickness or tend to invert, 3) if there is wound tension.
Because the resulting long, thin defect from plug removal is easily closed, undermining is rarely necessary. However, if there is any tension or areas where the dermis is bound down from the old grafting, conservative undermining should be performed. Interrupted sutures of 4-0 or 5-0 Vicryl are recommended for the deep dermal layer and surface closure with 5-0 Nylon or Poliglecaprone 25. Running and interrupted cutaneous sutures seem to heal equally well, as long as they are removed within 1 week.

2 – Removal Alone
When the underlying scalp is relatively normal in appearance and there is not enough hair in the abnormal grafts that re-implantation will significantly impact the overall result, removal of the hair itself may be indicated. This situation typically occurs either when very small grafts are mistakenly transplanted too low on the hairline, too far forward in the temples, or are pointing in the wrong direction. In these cases, the underlying skin may be normal and punch excision of the grafts would not only risk scarring, but the very small punch used might miss a portion of the follicle, resulting in regrowth of the hair. In these situations either electrolysis or laser hair removal should be considered.
Hair removal without re-implantation is sometimes the patient’s choice when the patient does not want to go forward with hair transplantation and, instead, chooses to reverse the entire process. The decision to remove hair by destructive means such as lasers or electrolysis must be balanced with the advantages of using of punches that can salvage hair. This is an important decision: even small amounts of hair recouped from plugs can have a significant cosmetic impact if transplanted into the patient’s open donor scars. This may allow the person desiring to reverse his hair transplant, to wear his hair shorter when the repair is complete.
Electrolysis
The success of electrolysis depends upon the operator’s ability to insert a fine needle directly into the germinative center of the hair follicle. A major limitation to electrolysis in repair is that because of scarring, the hair in the grafts tends to be distorted, making accurate needle insertion exceedingly difficult. The large number of thick, coarse hairs makes the procedure slow and tedious and electrolysis destroys the hair so that it cannot be used again. However, electrolysis may be useful when there are a small number of hairs in the wrong place, and the underlying skin is not significantly scarred. When hair is removed, the skin underneath it becomes more visible. If hair removal is to be used alone, the skin under it must be relatively normal in appearance. Larger grafts universally produce skin changes such as scarring, depigmentation and cobblestonning, so that hair removal alone will not suffice. In these situations, the abnormal skin can be partially removed through excision, improved through procedures such as dermabrasion, or covered with normal appearing follicular units. When appropriate, the latter is generally the most effective technique.
Laser Hair Removal
Laser hair removal is a relatively new technology that offers promise for repair work. As with electrolysis, the hair that is removed cannot be reused and the underlying exposed skin will be left in its previous state. However, the laser has the significant advantage over electrolysis of working even when the hair follicles are distorted, as it acts by being absorbed by the pigment in the hair shaft and does not rely on intact follicular anatomy. Because the laser light is selectively absorbed by melanin, it will work best on those patients with dark hair and light skin (those that appear most pluggy). These reasons may make the laser uniquely suited for repair work.
At this time, laser hair removal is not permanent and multiple sessions are still required. The most commonly used lasers for hair removal are the Ruby (694nm), Alexandrite (755mn), Diode (800, 810nm) and the Nd:YAG (1064nm). Other technologies, such as flash-lamp generated, pulsed, polychromatic light, that use filters to modify the wavelengths, seem to be less effective. Research in this field is continuing at an accelerated rate, with the Diode lasers possibly holding the most promise.
3 – Camouflage
Camouflage is at the heart of almost all repair procedures. Rarely does one attempt to return the patient to the pre-transplantation state by removing all the problem grafts, and rarely can excision and re-implantation alone solve the patient’s cosmetic problems. Camouflage is effective in conserving hair because it corrects the cosmetically important visible edge of the poor transplant and uses the existing grafts to provide volume. As discussed earlier, camouflage can be performed with or without prior excision and re-implantation, but if graft removal is planned, it should be performed before the camouflage is begun (see Repair Strategies).
At times, it may be appropriate to perform excision and re-implantation and a camouflage procedure (where additional hair is obtained from the donor area) in the same session. This would be useful when the excised grafts are away from the hairline and are not in an area that would interfere with donor hair placement. In this instance, both the hair from the grafts and additional hair from the donor area, may be used together to add camouflage, or fullness, to the front part of the scalp. Usually, however, the excised grafts were located in, or near, the frontal hairline, making simultaneous graft placement in this area difficult. A small camouflage procedure may also be reasonably carried out at the same time as excision and re-implantation when the main purpose of the camouflage procedure is to reduce the size of a donor scar rather than to harvest significant amounts of donor hair. The point is that, after graft removal, it is best to let the sutured area heal solidly before placing additional hair in the area.
As discussed previously, there is a natural tendency when confronted with a repair, to attempt to fill in the gaps between plugs. The tendency to fill in the spaces between plugs with more plugs can create a solid wall of hair and worsen the cosmetic problem, especially when the donor supply is limited. A problem with large grafts is that, even after excision and re-implantation, the overall density of the area is often too great. A properly planned camouflage should, therefore, not only make the plugs less visible, but also help to redistribute the density over a larger area.
Camouflage does not change the actual position of a hairline – that is the role of excision and re-implantation. It is important to emphasize to patients that camouflage changes the hairline’s appearance, but not its location. This misconception often makes the patient anxious to bypass the excision part of the procedure, hoping that camouflage alone will solve their problems.
The concept of camouflage is simply explained with the following analogy: if one wants to hide a picket fence, boarding it up will only create a solid wall and make it more obvious. It would be preferable to plant bushes and shrubs in front of it. The fence would still be in the same position, but not be as noticeable.
Establishing the Frontal Hairline
Camouflage is an important tool for all parts of the scalp, but its use in establishing a normal appearing frontal hairline is the essence of the repair. It is important to make the frontal hairline as perfect as possible, so that the observer’s eye will be brought back to the central part of the face rather than searching the scalp for additional irregularities. Not only will correcting the hairline improve the patient’s frontal appearance, but it will make the hair mass that many people comb forward to hide the unnatural hairline available to cover other areas of the scalp. This freedom to redirect the hair through styling is one of the most powerful aspects of a properly planned repair, especially in the face of limited donor reserves.
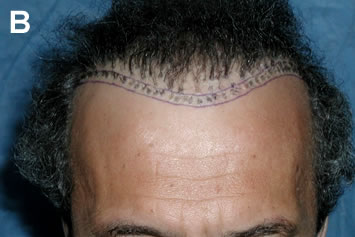
At the frontal hairline, camouflage is accomplished by creating a transition zone between the bald forehead and the abnormal grafts. For reasons discussed in the section, “Follicular Unit Transplantation: The Ideal Tool for Repair,” the transition zone is best constructed with follicular units, as they provide excellent camouflage with little additional wounding of the recipient skin and, at the same time, ensure a natural-looking result. The reader is referred to The Aesthetics of Follicular Transplantation4 for a description of how to establish a transition zone in a normal scalp. Creating a transition zone in a repair differs in that a number of additional factors must be taken into account, particularly with regard to depth and the specific arrangement of individual follicular units within the transition zone.
In a repair, the zone of camouflage should generally be made as deep as aesthetically possible, since the deeper the zone, the better the camouflage. Donor supply permitting, the zone of camouflage should usually be brought forward to the point where the adult hairline would normally have been established. However, it is important not to make this area so great that two distinct zones of density are created. Especially when the donor supply is limited, there may not be enough hair to create sufficient density in a wide zone of camouflage for this zone to relate aesthetically to the area it is trying to hide. Another exception would be when there is such extensive crown balding that a more conservative hairline would create a more balanced overall appearance.4 As a general rule, repair of the frontal hairline is the easiest of all repairs if the hairline had been placed far enough back to allow the surgeon to create a deep zone of camouflage using follicular units in front of the abnormal area.
A transition zone depth of approximately 1.5cm is usually the minimum needed to establish sufficient camouflage after two sessions. If the transition zone can be made deeper, occasionally one session may be adequate. If the transition zone must be narrower, such as in situations where the frontal hairline is already too far forward, three sessions may be needed. In general, the more forward the hairline and the more pluggy the appearance, the more important is the preparatory excision and re-implantation.
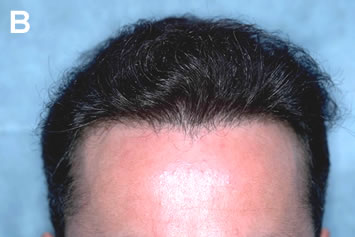
The depth needed for the transition zone will be greatly affected by the degree of plugginess and the patient’s hair characteristics. For the same degree of visual plugginess, a greater transition zone will be needed for patients with finer hair or those with dark hair and light skin. Interestingly, coarse hair tends to look the pluggiest, but coarse hair is also the best for the repair. This gives the patients with the worst appearing transplants a reasonable degree of hope. Fine hair, will often produce poor camouflage, even though the plugs were composed of the same fine hair (Figures 3A-B).

The deliberate placement of individual follicular units within specific areas of the transition zone is important for optimal correction. In a virgin scalp, the hairline is constructed by first placing 1-, 2- and then 3-hair follicular units, to create a soft, random zone of progressively increasing density (with 4-hair units reserved for the central forelock area). In a repair, the larger follicular units should not be placed randomly in the posterior aspect of the transition zone, but rather in deliberate locations either to negate the focal densities of larger grafts or to create local areas of increased density that break up the symmetry of the plugs. Aggressive graft excision is always needed prior to the camouflage to break up this visual wall, with the largest follicular units used to add asymmetry. A broad, uniform wall of dense plugs is one of the most challenging situations, as a very symmetrical hairline is more cosmetically bothersome and difficult to fix than an irregular one.
Occasionally, it may be useful to create a “widow’s peak,” as a means of breaking up a uniform hairline. This is best used when the patient had one naturally, but even in other patients, creating a subtle peak may be an extremely effective tool for adding asymmetry to the hairline. Some of the nuances in creating a widow’s peak may be found in The Aesthetics of Follicular Transplantation4 (Figure 4A-B).
Angling
Ideally, all transplanted hair should point in the direction that it originally grew. When using plugs was commonplace in hair transplantation surgery, improper angling was not only a matter of poor judgment, but was a result of the technical difficulties of placing the large grafts at very acute angles. The angled grafts had a tendency to heal at a different elevation than the natural skin surface due to the contraction of the surrounding connective tissue. As a result, the hair in the larger grafts often grew more perpendicular to the skin surface than natural hair. Unfortunately, even when using smaller grafts, surgeons still pay too little attention to the natural direction of hair.
The simplest approach to improperly angled grafts is removal. In situations where removal is impractical, such as when there are large numbers of small, poorly angled grafts, the doctor faces a dilemma. If he matches the angle of the existing hair, the problem will be compounded, but if the new hair is placed in the proper direction, it may not relate well to the old grafts, creating a v-shaped separation. This problem is resolved by the subtle, but progressive angling of implants away from the improperly placed grafts, so that the new follicular units adjacent to the old grafts are almost parallel to them and the grafts furthest away point in the normal direction.
Correct angling is especially important when covering defects in the crown, either from scalp reduction scars or from old grafts, as the crown is essentially a posterior hairline. When there are no markings for the natural swirl, a new swirl should be created off-center and angled sharply so that the hair fans out and lies flat over the defect. This has two main advantages. First, the eye looks into the layered hair, which provides much better camouflage than if one were to look at the hair directly on end. Second, the bulk of the hair is transplanted into normal non-scarred scalp, maximizing its potential for complete growth. In this technique, only a small amount of hair is transplanted directly into the less vascular scar tissue.
Weighting
“Weighting” is one of the most useful tools to increase the cosmetic impact of Follicular Unit Transplantation, and is an integral part of both normal restorations and repairs.4 Weighting can be accomplished by either placing the recipient sites closer together in select regions of the scalp or by using larger follicular units in these areas.
In a virgin scalp, both of these techniques are used to “forward weight” the transplant to enhance the patient’s frontal view (Figures 5A-C). When using weighting to create central density (i.e. a forelock-type distribution), graft sorting alone is the preferred technique. This will minimize the wounding of the central, less vascular parts of the sclap.4 Side-weighting is used to enhance a specific styling pattern and is accomplished by using more closely spaced, larger follicular units along the part side of the scalp. It requires a commitment on the part of the patient to continue to use a specific hairstyle. Side-weighting is, therefore, rarely considered in the first transplant when the styling preference is not known (Figures 6A-C).
In a repair, weighting techniques are important because the limited donor reserves makes planning around a specific styling pattern critical to achieving the best camouflage. Although the patient’s grooming preferences should always be taken into consideration, when there has been significant depletion of the donor reserves along with many cosmetic problems, the patient may not have many options. In this scenario, the one optimal way of performing the repair must be identified by the physician and explained to the patient in advance. Generally, side-to-side grooming with the hair combed diagonally back will give the best coverage. This will enable layering to give fullness to the frontal hairline and allow some of the hair mass to be combed backward to provide indirect coverage to the crown. All things being equal, left-to-right grooming is preferable over right-to-left, since the former is the styling preference of the majority of men and will draw less attention to the transplant. If the skin on the dominant side of the scalp is not scarred, both follicular unit sorting and spacing sites close together should be used to increase density. With a scarred scalp, only sorting should be used to limit further damage to the scalp.
When the major cosmetic defects are in the crown and donor reserves are limited, the most efficient way to utilize donor hair is to place it in the front and top of the scalp, rather than in the crown. The transplanted hair can then be combed straight back providing indirect coverage of the crown. As with side-weighting, this has the advantage of placing hair in less-scarred scalp and maximizing the effects of layering so that the least amount of donor hair is used.
The Hockey Stick and Tacking Hair
In situations where there are markedly depleted donor reserves, a more exaggerated form of “side-weighting” called the “hockey stick” may be useful4. This might occur in patients with very low density, when open donor harvesting has severely depleted the donor supply, when plugs are scattered in different cosmetic areas (such as the temples and crown), or when scalp reductions have rendered the patient’s donor supply unharvestable (by severely reducing the donor density and/or scalp laxity).
The “hockey stick” is accomplished by placing the majority of the new follicular unit grafts along the frontal hairline and along the part side, with only lightly scattered units in other areas. This takes advantage of dedicated side-to-side grooming that establishes a frame to the face and adds fullness to the front of the scalp. It also allows the hair on the part-side to be combed, and thus layered, over the thin and/or pluggy areas on the top of the scalp, providing coverage using a minimal amount of hair.
The grafts used in the more sparse areas are called “tacking hairs.” These hairs serve to anchor the hair combed over them from the more densely transplanted areas. Tacking hairs are composed of only 1- and 2-hair follicular units to conserve the donor supply and avoid making these rather isolated grafts appear unnatural. This “tacking” helps to keep the longer frontal hairs in place during routine activities, and in the wind. The “hockey stick” and “tacking hair” are explained in more detail in The Aesthetics of Follicular Transplantation4 (Figure 7).
C. Special Cosmetic Problems
Scalp Reuctions
The potential problems caused by scalp reductions were recognized early in the history of their use, but it took several decades for these problems to be fully appreciated by the majority of hair restoration surgeons. Fortunately, scalp reductions have been performed much less frequently in recent years. ((Bernstein RM. Are scalp reductions still indicated? Hair Transplant Forum Intl. 1996; 6(3):12-13.)), ((Norwood OT, Shiell RC, Morrison ID. The complications of scalp reduction. J. Derm Surg Oncol 1983; 9:831-839.)), ((Norwood OT, Shiell RC. Hair Transplant Surgery, 2nd ed. Springfield, Illinois: Charles C. Thomas, 1984:163-220.)), ((Norwood OT. Scalp reductions: Are they necessary? Hair Transplant Forum International 1993; 3(6):1-2.)) Scalp reductions have the undesirable effect of simultaneously causing cosmetic problems and depleting the donor supply needed to correct them.6 Simply stated, they alter the balance between supply and demand. They increase the demand for hair by producing scars in the top and crown that must be camouflaged, alter natural balding patterns and change hair direction, all without significantly adding coverage to the front of the scalp. They diminish supply by decreasing donor density and scalp laxity, thereby reducing the amount of hair available for the correction.
These problems can be partially addressed by the “hair conserving” technique of microscopic dissection, but after multiple scalp reductions, with even the best techniques, full correction is often not possible. Specific patterns of repair, such as the “hockey stick,”4 used for treating patients who have low donor supply, are particularly useful in patients with low donor supply because of scalp reductions or scalp lifts.
Scalp reductions and scalp lifts, particularly when performed by inexperienced hands, can leave an unacceptable scar in the crown. This scar can be camouflaged, but it requires a considerable amount of hair. In addition, scar tissue limits the amount of hair that can be transplanted into a given area in one session, so that multiple sessions are often required. When hair is transplanted directly into the scar, the patient can run the future risk of having an abnormal growth pattern as the hair loss progresses. The creation of an off-center swirl, previously discussed, can be used to cover scalp reduction scars without having to place a large amount of hair directly into the scars, and can partially address future balding with its fanned hair pattern.
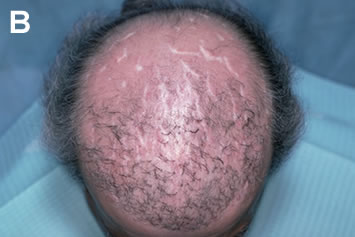
In general, correcting scalp reductions and their associated defects can be approached similarly to correcting plugs and depleted donor supplies. Therefore, correct the front and one side as much as possible and allow that hair to camouflage problems in the back with either light coverage or tacking hair (Figures 8A-D). Problems specific to poorly executed scalp reductions that cannot be camouflaged, such as “dog-ear” deformities (the puckering of excess tissue at the ends of the incision), should be addressed prior to the camouflage procedure. A dog-ear deformity, caused by the failure of the surgeon to make the length of the incision sufficiently greater than the width or the failure to account for the curvature of the skull, can be corrected by excision. The hair in the excised tissue should be dissected into follicular units and re-implanted. (Figures 9A, B).


Ridging
As discussed in the section “Limitations,” ridging is caused by the increased volume of tissue associated with grafts larger than follicular units and the body’s reaction to that tissue. The reaction, hyperfibrotic healing ((Unger M. Hyperfibrotic transplants. Hair Transplant Forum 1993; 3(4):8-9.)), occurs with greater frequency and severity when larger grafts are transplanted. Ridging from grafts in the frontal hairline gives the head an elongated rather than rounded frontal appearance that accentuates the defects caused by the large grafts.
The growth of grafts in areas of ridging tends to be poor. The area can be improved cosmetically by punching out selected plugs where the ridging is most severe. This will decrease both the plugginess and the total tissue volume. It is important to perform a few trial punches to be certain that the wounds heal with less elevation. In some cases, even the trauma of removing the grafts seems to contribute to the hyperfibrotic change.
When hyperfibrotic change occurs around slit grafts, especially large ones, deep depressions around the grafts may be seen in conjunction with an exaggerated, tufted appearance of the hair. In this situation, every attempt should be made to completely remove the grafts. The punch should be large enough to extend slightly beyond the edges of indented skin, so that the two wound edges will lie flush when approximated and not invert. If the slits are greater than 3mm, the punch should be used to remove one-half of the defects, with the remainder being excised in a subsequent session. As an alternative, if the large slit is removed from the frontal hairline, it can be excised with a free-hand ellipse.
Once the area of ridging has been improved, it seems to accept grafts better in subsequent sessions, but the growth of newly transplanted hair may still be inconsistent. For this reason, follicular units should be placed in the normal skin in front of the hyperfibrotic change (if the position of the hairline permits) so that adequate camouflage can be ensured.
Hair Loss from Face Lifts
Hair loss is a common complication of face and brow lifts, but this is rarely explained to the patients considering these procedures. Alopecia from face and brow lifts can be due to a number of factors:
• Destruction of hair from incisions not parallel to the follicles
• Destruction of hair from suturing
• Destruction of follicles from undermining
• Excessive skin tension
• Disruption of the vascular network in the skin
• Stretched scars devoid of hair
• Distortion of the normal hairline
• Decreased density from stretching the scalp
• Telogen effluvium from the trauma of the surgery
• Telogen effluvium from the anesthesia
• Acceleration of androgenetic alopecia
It is tempting to perform the hair restoration procedure soon after the face-lift. However, it is preferable to wait at lease one year so that the surgical scars can mature, scalp laxity can return to normal and, most important, so any hair loss from post-surgical effluvium has had time to regrow.
A problem intrinsic to treating alopecia from face-lift procedures is that the hair may be transplanted into the same spot where future face-lift incisions will be placed. If the hair loss from the face-lift is not excessive and/or there is a question about long-term donor supply, it may be preferable to postpone the repair until after the second face-lift. This is especially important in younger patients where multiple face-lifts are anticipated. If such surgeries are anticipated, and if hair loss in the area surrounding the surgical incisions is the primary problem (rather than the scars themselves), one may place hair only in the surrounding areas of thinning and not in the actual scar. Another way to circumvent this problem is to avoid “aggressive” lifts or postpone aspects of the face-lift procedure that are more likely to result in hair loss, such as a brow lift.
A second problem arises when the signs of androgenic alopecia are not present (or if present, not taken into account) when the decision to perform a face-lift is made. In a patient with no apparent hair loss, potential androgenic alopecia may be suspected from a positive family history or the presence of miniaturization greater than 20% in the front or top of the scalp. This can be assessed using a hand-held Densitometer (see the section Low Donor Density). Miniaturization greater than 20% in the back or sides of the scalp (“the permanent zone”) suggests that the patient will likely develop diffuse hair loss and, therefore, is not a good candidate for hair transplantion.3
Once it has been established that a face-lift patient has little risk of significant androgenetic alopecia and the decision to perform a transplant has been made, the patient should be advised that it would take a minimum of two procedures to accomplish the restoration. The goal of the first procedure is to restore the shape of the original hairline and to add as much density as possible. Subsequent sessions should be used to add further density and, when necessary, to soften the hairline’s frontal edge.
When hair loss follows a face-lift procedure, the entire frontal hairline extending down to the sideburn area often needs to be restored. In this hair transplant procedure, it is important to maintain the rounded female hairline. The hair direction in the female frontal hairline is usually more varied than the predominately-forward direction of the frontal hairline seen in males. The female hairline is often characterized by “licks” and “peaks.” These should be restored for optimum results.4 Especially in the case of brow lifts, there may be broad areas of thinning both anterior and posterior to the coronal incision. These regions should be filled with follicular units as closely spaced as the physician is comfortable with, as transplanted hair, compared to the more dense hair directly behind it, will generally appear too thin. Once the first few millimeters of the hairline have been transplanted with smaller units, the largest follicular units should be used to achieve the greatest frontal density possible. In spite of this, it may still take multiple procedures to achieve satisfactory density.
In contrast to men, many women have fine, vellus hairs at their frontal hairline. Since donor hair is generally harvested from the mid-portion of the permanent zone, the diameter of this hair may be too great for the frontal hairline or temples. If the match is not right (a situation that is more often seen in women with darker, coarse hair) finer hair should be used. It is not recommended to use the fine hair located on the posterior scalp or behind the ears for this purpose. Scars placed below the occipital ridge will tend to stretch, and those behind the ear may interfere with further face-lifts. The preferred method of these authors for generating finer hair is to remove all or part of a terminal hair’s bulb prior to implantation. This can be accomplished using a # 10 scalpel blade under a stereomicroscope. The single, split-hairs should be placed at the very frontal edge of the hairline and temples at an angle so acute that it is practically flush with the skin surface.
D. Donor Repair
Prior to revising a scar, it is important to take a careful patient history and find out specifically what, if anything went wrong with previous surgeries. It is presumptuous to think that just because a patient has scarring, the next procedure will make it better. One should carefully review the surgical history and, if possible, speak with the original surgeon to see if there are any techniques that could be improved upon, or problems that occurred which might be avoided in future procedures.
The cause of an unacceptable scar may be due to poor healing intrinsic to the patient, such as the tendency to form keloids. It might also be caused by a genetic predisposition to poor healing because of connective tissue defects, such as Ehlers-Danlos Syndrome ((Bernstein RM, Rassman WR. The scalp laxity paradox. Hair Transplant Forum Intl. 2002; 12(1):9-10.)) (Figures 10A, B). Genetic or drug induced coagulopathies, or medications that interfere with healing can also result in unacceptable scars. In addition, scarring may be caused by complications such as a post-operative infection or simply from the patient not following post-op instructions, such as smoking or performing strenuous exercise too soon after the surgery. ((Smith JB, Fenske NA. Cutaneous manifestations and consequences of smoking. J Am Acad Dermatol 1996; 34:717-32.))

As emphasized in the preceding discussion, a depleted donor supply is the major limitation to a successful repair. The inability to harvest additional hair is caused by two main factors. The first factor is the physical limit set by the combination of low donor density and poor scalp mobility. When donor density is low, a larger strip must be harvested to obtain an adequate amount of hair. A tight scalp, however, limits the size of the strip that can be removed. After multiple procedures, attempting to harvest additional hair is no longer worth the risk of a possible widened scar. Every hair transplant procedure simultaneously decreases donor density and scalp laxity, but poorly executed surgery does this to a greater degree and decreases the supply without making proportionate cosmetic improvements in the recipient scalp.
The second factor is the visibility of the donor scars. Once the donor scars are to the point of near visibility, the ability to harvest additional hair is severely limited, as further surgery would make the patient’s previous transplant surgery apparent. An important point to keep in mind in judging how much additional hair is available, is that coverage of donor scarring is more closely related to the amount of donor hair present than to the degree of scarring. Therefore, any process that removes hair along with the scar will run the risk of making the donor scarring more visible. The reason is that when scar and hair are both removed, the closure will further stretch the scalp and decrease the density of the remaining hair. This may prevent it from covering other scars that have not been excised or thin out the appearance of the donor fringe to an unacceptable degree.
Techniques, such as Follicular Unit Extraction, where follicular units are harvested directly from the donor area without a linear excision can be useful when the scalp is very tight. The usefulness of this technique is limited, however, as significant donor scarring makes removing hair without transection difficult and a donor zone of low density limits the amount of hair that can be removed without the area becoming too transparent.
Repair of Open Donor Scars
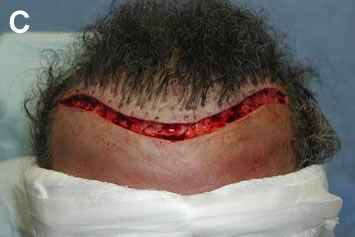
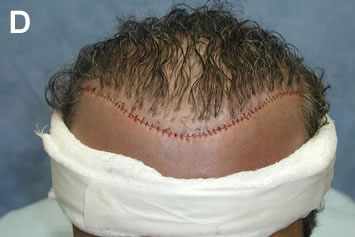
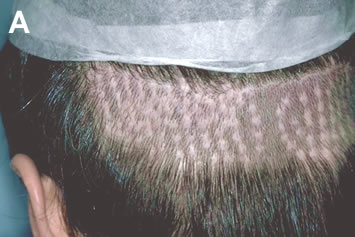
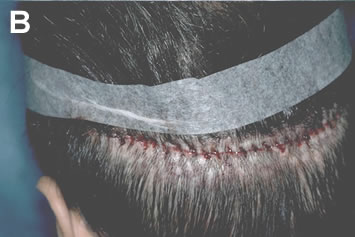
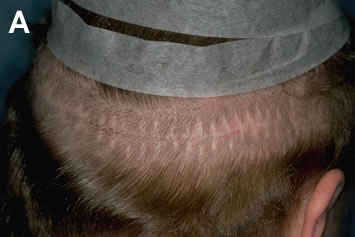
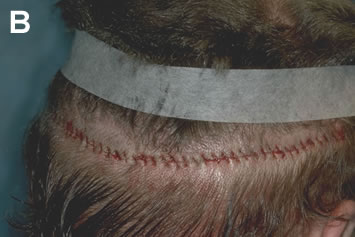
The most common type of donor scar revision is the excision of the round scars (produced by the open donor technique) during routine, single-strip harvesting in subsequent hair transplant sessions. This is most easily accomplished when the old scars lie directly in line with the proposed new strip (Figures 11A, B). Although a relatively simple procedure, the following points should be kept in mind when excising open donor scars.
1. Healed open donor scalp often has decreased mobility when the tissue is bound down to the underlying fascia. It results from punches that are too deep and necessitates that the surgeon remove a narrower than normal strip.
2. Wound edges tend to be more friable than normal scalp. To prevent the edges from tearing during suturing, a thinner strip should be planned to minimize wound tension. 3. Finally, avoid excising open donor scars that are placed too low. This can cause the greatest problem, as the new linear excision will be subject to stretch from the underlying movement of the neck muscles. This can result in a stretched scar that is much worse in appearance than the original open donor scars.
Repair of Linear Scars
Removing unacceptable linear scars by re-excision should be considered when scarring is well localized and the cosmetic benefit from its removal will be more than offset by the decreased density of the surrounding hair. Because of the importance of the surrounding area for camouflage, success in decreasing the size of an existing scar depends as much upon the choice of the scar as upon the actual surgical technique used to repair it.
A number of surgical techniques have the tendency to produce poor donor scars. An understanding of how these techniques may contribute to poor wound healing provides insight into how the repair may best be accomplished. The more common problems are:
• Deep donor incisions
• Wide donor strips
• Suturing with large bites
• Poor wound edge approximation
• Non-contour incisions
• Donor incisions placed too low
• Donor incisions placed too high
Deep Donor Incisions
The fascia acts as a structural support for the healing wound. When this support has been violated, the risk of having a widened scar is greatly increased. The use of copious amounts of tumescent anesthesia infiltrated directly into the subcutaneous fat will elevate the dermis and increase the distance from the base of the follicles to the fascia. This is probably the single best way to keep the wound superficial.
With the single-strip harvesting method used in Follicular Unit Transplantation, if the outer edges of the donor strip are cut too superficially, they can be easily deepened with a single blade as the strip is being lifted from the scalp. When using a multi-bladed knife, the standard tool in mini-micrografting, multiple superficially cut strips are almost impossible to deepen in-vivo, and once removed from the scalp further dissection is extremely problematic. Because of this, the surgeon has the tendency to cut more deeply with a multi-bladed knife and this increases the risk of cutting through fascia.
Once the fascia has been cut, the healing will partially obliterate the subcutaneous space. The elimination of this natural surgical plane makes it difficult to judge the depth of subsequent excisions. In the repair, it is therefore important for the surgeon to have greater control over the wound depth. This is best accomplished by using a single-bladed scalpel that allows each wound edge to be treated separately. A single blade is also beneficial when the scarred area is devoid of hair and the angle of the incision does not need to follow the angle of the follicle. In this case, a more perpendicular incision will enable better edge to edge contact and avoid the thin, friable upper edge produced by the fixed angle of some multi-bladed knifes.
When the harvesting is superficial and there is no tension on the wound, a layered closure is rarely needed, as there is no place to position the deeper sutures without impinging on follicles and there is no need to suture the fascia, as it has been left intact. In contrast, with a repair the fascia has often been violated. A meticulous layered closure that includes fascia is important because there is often significant wound tension and the sutured scar tissue regains its wound strength more slowly than normal hair-bearing scalp.
Although one should never undermine in a properly planned harvest in a virgin scalp, in a repair procedure conservative undermining is sometimes required. Undermining should generally be carried out in a superior direction with care to stay deep to the fascia or scar tissue so that follicular damage will be avoided. Undermining in an inferior direction will allow the movement involved in neck flexion to be transmitted to the wound edge, increasing the potential to stretch.
When a layered closure is required, interrupted sutures provide the most secure and controlled approximation of the deeper tissues. Polyglactin 910 (3-0 Coated Vicryl) is a braided absorbable suture that has good tensile strength and handling properties and is an excellent material for deep sutures. Recently, we have been using the synthetic monofilament Poliglecaprone 25 (3-0 Monocryl) for deep closures. This suture has the advantage of causing less inflammation but, being a monofilament, tends to cut through the tissue more easily and is slightly more difficult to tie.
Wide Donor Strips
In the era of mega-sessions, taking too wide a donor strip has been a common problem in hair transplantation surgeries. A wide strip places unnecessary tension on the donor closure and leads to a widened scar. Hair loss associated with this type of closure does not adequately compensate for advantages of the larger session.2,3 When larger sessions are appropriate, and the scalp does not have good mobility, the surgeon should consider a longer incision rather than a wider one. Harvesting a donor strip of appropriate width, so that there is minimal tension on the wound closure, is the single most important thing that a surgeon can do to minimize donor scarring.
Once a wide initial incision had been identified as the cause of a widened scar, it is preferable to wait at least 8 months so that the scar has a chance to mature and regain some of its original laxity. On re-excision, it is advisable to make the new strip at least 3-6mm narrower than the previous one. When a tight closure is the cause, one should generally not attempt to remove the entire width of the old scar since this invariably leads to a reoccurrence, or worsening, of the old scar. To facilitate healing, the new excision should extend into one hair-bearing edge. In other situations, when adequate laxity is present, removing the entire scar width may be beneficial. When two hair-bearing areas are approximated, the healing seems to be improved. The issue of whether the additional wound security from suturing into a hair-bearing edge outweighs potential hair loss from the suturing itself should be decided on a case-by-case basis.
In general, the surgeon should not attempt to remove the entire length of the old scar, as a shorter incision will create less tension on the closure. The repair excision may extend further anteriorly than the previous excision, but should not go to the contra lateral side, as the suturing of one side will create tension on the other. If the repair is successful, the remaining scar may be removed in a subsequent session.
A creative way to repair the defects caused by tension closures, called “Deep Plane Fixation” has recently been proposed by Seery. ((Seery GE. Improved scalp surgery results by controlling tension vector forces in the tissues by galea to pericranium fixation sutures. Dermatol Surg 2001; 27(6):569-574.)), ((Seery GE. Hair transplantation: Management of the donor area. Dermatol Surg 2002; 28(2):136-142.)) In this technique, he “channels away the tension forces from the superficial, at risk tissues, into deeper tissues where they are harmlessly dissipated.” The procedure is accomplished by first suturing the deep dermis of the superior wound edge to the deep tissues or fascia of the inferior wound edge. The upper dermal/epidermal components of the two wound edges are then sutured together, end-to-end, ideally without tension.
Suturing with Large Bites
When suturing with large bites a significant amount of hair-bearing scalp is incorporated within the sutures. Especially with a running stitch, any post-op edema or tension in the donor area will tend to compromise the blood supply of the entrapped tissue and may result in permanent hair loss. In addition, if there is any tension on the wound, the mechanical pressure of the sutures can cause hair loss.7 In the repair procedure, it is useful to use horizontal mattress sutures to reduce wound tension. Small bites, very close to the wound edge, are recommended for the superficial closure. The cutaneous suture, Poliglecaprone 25 (5-0 Monocryl), is excellent due to its low tissue reactivity and relatively slow loss of tensile strength (2-3 weeks).8 Metal staples are useful when sutures need to be left in place for extended periods of time. However, staples have the disadvantage of not allowing for perfect wound edge apposition and causing greater post-operative discomfort than sutures.7 The advantage of staples in being less destructive to hair follicles than a running suture is of less importance when the closure involves mostly scarred scalp (Figures 12A, B).
Poor Wound Edge Approximation
Perfectly apposing the wound edges of the donor incision is a key factor in preventing the scar from stretching. Since the incision made in harvesting the strip should follow the angle of the hair, one edge will necessarily be acute and the other obtuse. Suturing techniques that do not account for the different angles of the two wound edges will not be able to keep the edges flush and will result in inadequate dermal-dermal contact and a spread wound.
Careful suture placement with small bites is the best means of keeping wound edges apposed, but it is often a time-consuming process. Although faster to place, metal staples do not allow for the same amount of control as sutures and can result in a wider scar, especially if there is any tension on the wound. If the wrong suture material or poor suturing technique can be identified as the cause of the wide scar, this can be remedied by a more meticulous closure using the appropriate sutures.
Non-Contour Incisions
Incisions that do not follow the natural curved contour of the skull tend to heal with wider scars than those that follow it. When a re-excision is planned, it is important to have the new excision follow the natural curvature of the skull, regardless of the linearity of the original excision and regardless of whether the new excision completely encompasses the old excision. Special care should be taken so that the re-excision stays above the mastoid area. It is sometimes useful to make the excisions narrower in this area. In most cases, the focus should be on reducing the size of the original scar and changing its direction, rather than on eliminating it entirely.
Donor Incisions Placed Too Low
Of the various factors contributing to a widened donor scar, the most problematic with respect to the repair is a low incision on the posterior scalp. Some surgeons feel that hair lower down on the scalp is a good source of fine hair, however, this hair may not be permanent and harvesting it may result in unacceptable scarring due to the location. In the rare instance that 1-hair follicular units are not delicate enough, (such as in the front edge of the temples, or the leading edge of a female hairline) fine hair may be generated by removing all, or part, of the bulb of terminal hair harvested from the mid-permanent zone.
As discussed in the section “Limitations,” the most desirable position for the donor scar is in the mid-portion of the permanent zone. In most individuals, this lies at the level of the external occipital protuberance, at the midline, and the superior nuchal ridge, as one moves laterally. The trapezius muscle, the most superficial muscle of the nuchal area, originates from the superior nuchal line and the ligamentum nuchae. ((Salasche SJ, Bernstein G, Senkarik M. Surgical Anatomy of the Skin, Connecticut: Appleton & Lange, 1988:268.)) Incisions that lie below the nuchal line will, therefore, be affected by the muscle movement directly below it and have a greater tendency to stretch. This problem is exacerbated when a deep donor scar obliterates the subcutaneous layer and muscle movement in the neck is more directly transmitted to the overlying skin.
It has been advocated by some that wide donor scars can be treated with re-excision in conjunction with aggressive undermining, and possibly tissue expansion. ((Unger WP. Correction of Poor Transplanting. In: Unger WP, ed. Hair Transplantation, 3nd ed. New York: Marcel Dekker, 1995:375-388.)), ((Swinehart JM. Hair repair surgery. Corrective measures for improvement of older large-graft procedures and scalp scars. Dermatol Surg 1999; 25(7):524-529.)) However, even the conservative re-excision of a widened scar that is located in the inferior portion of the occipital scalp carries a significant risk of healing with an even wider scar. Scars in this area should not be re-excised and, if additional transplants are performed, hair should be harvested from an incision made above it in the mid-permanent zone, leaving a thin zone of hair separating the upper and lower incisions. Instead of attempting to remove a difficult scar, its appearance may be more consistently improved by the addition of small amounts of hair to the area, with far less risk.
Donor Incisions Placed Too High
When a donor incision has been placed too high, it is best left untreated unless the scar is wide and poor surgical technique has been identified as the cause. Often, the surgeon who used poor judgment in placing the wound too high did an equally poor job in the closure. In this case, there is a reasonable chance the scar may be improved with better techniques. As with other scars, one should generally attempt to lessen or improve the appearance, rather than trying to remove the scar entirely.
The temptation to add hair into a high scar should be resisted, as progressive balding would isolate the hair-bearing scar and present new cosmetic problems, demanding additional hair. An exception to this is placing hair into the lower portion of a vertical scalp reduction scar that dipped way down into the permanent donor fringe.
Implantation of Hair
When a localized area of a donor scar is cosmetically bothersome, its excision is impractical, and there is easily accessible donor hair in other areas, it may be beneficial to place hair directly into the widened donor scar. Two and 3-hair follicular units are the most useful for this purpose and should be inserted at very acute angles. Only a small amount of hair is generally needed to soften the appearance of a scar. Dedicating too much hair for the purpose is unnecessary and wasteful. It appears that grafts do not grow well when the scar is hypertrophic, and it is best to manage these scars with intra-lesional corticosteroids, 5-fluouracil or silicon gel sheeting, before attempting to add hair.
Conclusion
The “science” in hair restoration surgery involves the ability to mimic nature as closely as possible, by carefully matching the newly transplanted hair to the patient’s original hair in its distribution and growth pattern. Once these principles have been violated, a standardized approach will no longer suffice in restoring the person’s normal appearance. Presented with dramatic cosmetic defects, a severely limited donor supply, and an exasperated patient, the surgeon attempting a repair faces a set of challenges quite different from those encountered when operating on a virgin scalp.
In corrective surgery, the judicious use of every graft is critical and setting surgical priorities is as important as the technique itself. In repair work, the routine, symmetrical placement of grafts will often not be sufficient to accomplish the patient’s goals. The surgeon must find ways to transform harsh walls of hair into soft hairlines and make small quantities of hair camouflage larger areas. The surgeon must be able to tap every bit of harvestable hair from the donor area and even reuse hair from previously transplanted grafts. To achieve the best results, the creative use of every follicular resource is required. This is the “art of repair.”