Background
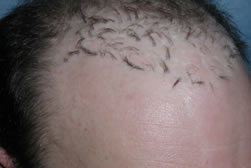
For many years, the “corn-row” or “pluggy” look was synonymous with hair transplantation. The look was created by transplanting large, circular grafts of skin and hair, colloquially referred to as “plugs,” which were obtained from the back of the scalp using a round cookie-cutter like instrument called a trephine or punch. It was the only way hair transplants were performed in the 1960’s and 1970’s, and was the most popular hair transplant method through the mid-1980s. See the History of Hair Transplantation.
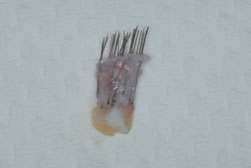
Grafts began to decrease significantly in size as mini-micrografts (obtained from strips) gained popularity in the later part of the 1980s and early 1990s. Although Follicular Unit Transplantation (FUT), which uses naturally-occurring groups of one to four follicles, was first introduced in 1995, it wasn’t until after the year 2000 that it became the predominant method of surgical hair restoration. (see the page on Milestones in FUT & FUE) Because of this, over a period that spanned 40 years, hundreds of thousands of patients have been treated with grafts that were unnaturally large.
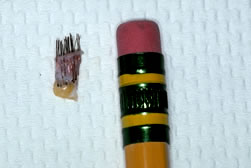
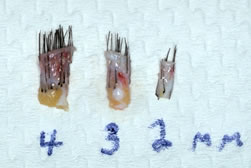
The problem with large grafts is that the density within the hair plugs is too high and the density between the grafts is too low. The “pluggy look” is exacerbated by the contraction of large grafts after they are transplanted. This causes the density of the hair in the grafts to increase and the space between the grafts to widen.
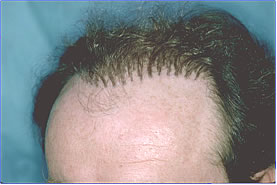
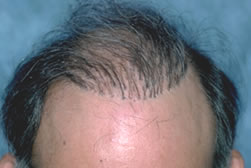
It was felt that with additional hair restoration sessions, a hair restoration physician could eventually “fill-in” the gaps between the plugs. The problem is that before this goal was achieved, the patient would run out of donor hair, leaving either an unnatural pluggy look or just a small area of extremely high density with little hair in other areas of the scalp to balance it.
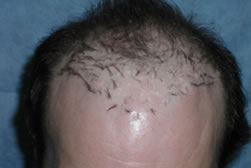
Repair Technique
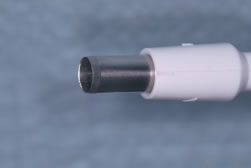
When faced with large grafts, the solution is to either make them smaller (by excising only a portion of the hair graft) or remove them completely. This is called graft (plug) excision. Because large grafts have often been placed in the wrong location or have hair that points in the wrong direction, their complete removal is generally required. Either way, the hair obtained from removing these grafts would be transplanted back onto the scalp in a more natural distribution.
Plugs are removed from the recipient area using the same instrument that was used to remove them from the donor area – a round punch called a trephine. The punch used to extract the plugs must be smaller than the original punch because the grafts contract after they are removed.
Graft excision involves four steps:
- The larger grafts are punched out of the recipient area
- The holes created by the removal of the grafts are sutured closed
- Using stereo-microscopes, the plugs are carefully dissected into individual follicular units
- These follicular units are re-implanted at the proper angle and in a more natural distribution
A critical aspect of graft excision is to suture closed the holes left after the grafts have been removed. This step is important because suturing brings together the normal skin on either side of the excision and significantly reduces the scarring. If the holes are left un-sutured, the defect will fill in with scar tissue and heal with permanent white marks — a telltale sign of the old “plug” procedure.
- Hair Transplant Repair
- Before & After Photos
- Video
- Answers
- Physician Consult
During adolescence, the hairline lies just above the upper forehead wrinkle (i.e. just above the muscle). The normal adult hairline is about 1½ cm (approximately one finger breadth) above this in the middle of the forehead and significantly higher at the temples. A common error in hairline design is to restore the hairline in an adult to the adolescent position.
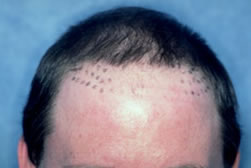
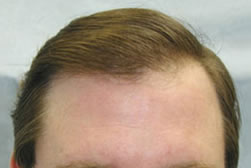
In the following example, Patient VRI had a very low hairline created with large grafts when he was in his twenties. This low, unnatural hairline forced him to wear a hairpiece for years. His natural hairline was actually in the proper position for an adult; therefore, removing the grafts was all that was required for the hair transplant repair. The repair was accomplished in four sessions of hair graft excisions and re-implantation with the old graft sites meticulously sutured closed. Note that there is little alteration of the skin in the area where the grafts were removed, because the excision technique removed the scarred skin at the base of the grafts as well as the hair. No additional hair was used from the donor area.
Graft excision with re-implantation of the hair from these grafts is generally followed by one or two sessions of Follicular Unit Transplantation using hair obtained from a donor strip — or less commonly through Follicular Unit Extraction (FUE). As stressed above, the holes left where the grafts were removed are always sutured closed to give the best cosmetic result. The hair obtained from these grafts is usually placed in the central part of the scalp away from the frontal hairline. There are two reasons for this; the first is that the sutures at the hairline would interfere with the proper placement of the hair; the second is that the hair from removed grafts is often slightly wirier due to the scarring, so this hair is best used as “filler” rather than at the hairline. The hairline is best recreated from “virgin” hair removed from the donor area in subsequent Follicular Unit Transplants.
Hair Transplant Reversal
Occasionally patients want their original hair transplant “reversed.” In this case, the hair obtained from the excised grafts is placed back into the donor area — in the exact location from which the hair grafts originated. If there is extensive open donor scarring, the scarring can be reduced by excision prior to the grafting (see Fixing Scars). If there is not enough hair in the excised grafts to adequately camouflage the donor area scars, additional hair can be obtained using Follicular Unit Extraction (FUE) with the hair being obtained from the area surround the scar.
The advantage of performing a graft excision when attempting to reverse a bad hair transplant is not only that it allows the surgeon to re-use the hair to fix the donor area, but it improves the condition of the skin in the area from which the grafts were removed. When the transplanted hair grafts are too small and too numerous to be individually excised, and if the underlying skin is not significantly damaged, laser hair removal may be appropriate, although none of the hair removed by this process can be reused.
For more details on these patients and to see additional examples of corrective work performed at Bernstein Medical, please visit the Hair Transplant Repair section of our photo gallery.
For a comprehensive discussion of corrective hair transplantation procedures read Dr. Bernstein’s paired publications, The Art of Repair in Surgical Hair Restoration: Part 1: Repair Strategies and Part 2: The Tactics of Repair


